Showing posts with label DIY Projects. Show all posts

Tuesday, August 11, 2009

Gumdrop Wreath DIY Tutorial

Gumdrop wreaths are so cute...and SO EASY to make!


They are perfect for holidays like... Halloween, Christmas, Valentine's Day and Birthdays... to name a few!

Lets begin!

Here is what you will need:

-A Styrofoam Wreath (any size you want. A 14" wreath is used here)
-Toothpicks
-About 8-10 bags of Spice Drops (Or gumdrops if you prefer a larger candy look)
-Ribbon (to hang)


Push the toothpick into the spice drop or gumdrop. Push the other end into the Styrofoam. Repeat a thousand times. ;)


Arrange the colors anyway you would like.
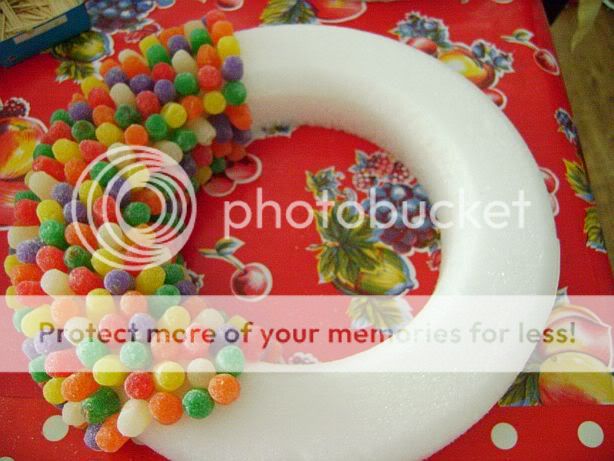


Keep on fillin'!

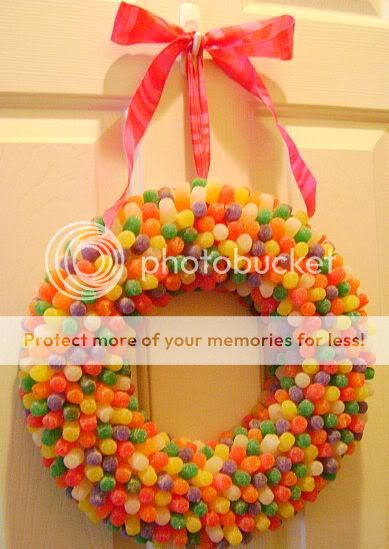
Before you fill in the whole wreath, tie a ribbon onto the Styrofoam wreath. This allows for easy hanging....AND... by doing it this way, you will not see the ribbon around the wreath. Just Gumballs! After the ribbon is secure, poke gumball toothpicks through the ribbon and arrange gumballs around it to conceal it.

Note: You can also wrap metal wire around the wreath, securing it with masking tape, and create a loop for your ribbon with the wire. I prefer the ribbon method. It is just easier to tie the ribbon directly onto the Styrofoam for me. But both ways work.


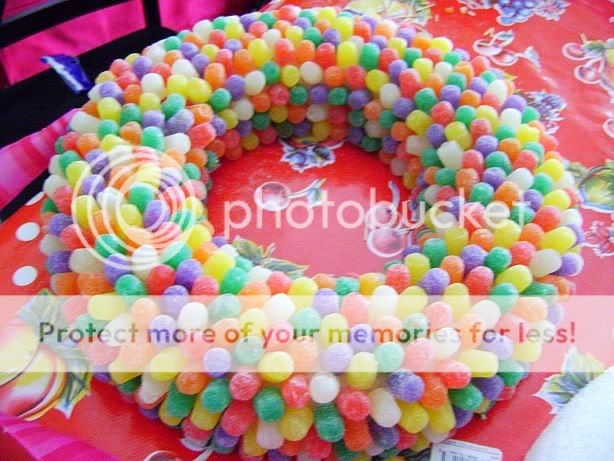
As soon as it is all filled in, spray the frame with the iridescent or clear spray paint. This seals the candy and prevents it from getting moldy over time. If you are hanging up your wreath for only a short time... this is step is optional.

NOW.... hang 'er up!!


It really is that easy!


Other options:

Gumdrops and Spice drops mixed together:


Picture Source: Sewdarncute.typepad.com

Bigger Gumdrops only:


Picture Source: Ehow.com

Gumdrop Topiary


Picture Source: Sheknows.com

Mini-Gumdrop Wreaths as a Candle Centerpiece on a Table


Source: Unknown :(

I wouldn't advise hanging this wreath on doors that slam often... as the gumdrops, collectively, have a little bit of weight with them and can shatter the Styrofoam wreath. Just a bit of advice. I would hate to spend an hour or two gumdropping up a wreath for it to be destroyed when a kid slams the door accidentally. ;)

Have fun making a little slice of Candy Land! Don't forget to check out my previous post highlighting my Niece's Candy Land themed birthday party!


Read All About It!

Friday, June 26, 2009

Chalkboard DIY Project

It is Metamorphosis Monday at Between Naps on the Porch hosted by Susan. I have also linked this post up with the Crazy About Chalkboard party at The Shabby Chic Cottage!


DIY Chalkboard Project


This DIY chalkboard project is so easy...

1. Buy an unfinished mini chalkboard. You can find them here.
2. Paint any color and any design that suits your fancy.
3. Screw in "Screw Eyes" on tops of chalkboards. You can find them here.
4. Tie ribbons through the screw eyes and hang!

Super easy. You can use as many chalkboards as you want to spell out whatever you choose!

Before:

After:
I painted both sides... so I have 8 different boards.
I decided I would figure out the possible combinations I could create with 4 boards painted on each side... creating 8 unique designs. I vaguely remember combinations and Pascal's Triangle from high school and college math. However, while trying to figure out the formula, I blew my mind. haha So my math wizard husband came to the rescue and concluded 502 possible combinations can be made. I checked his work and he was right. ;)
502. Pretty impressive, eh?

My vision was to write single letters on each chalkboard to spell a word. But who am I to dictate how you write on your chalkboard? The Prairie believes in freedom of chalkboard expression and supports however you decide to write on them. ;)

You can hang some in the laundry room:

Or the kitchen:

Scratch that.

That is more like it!

Or anywhere your heart desires...
I enjoy thinking up four letter words (nice ones!)... it helps keep the ol' noodle sharp. And any word combination/spelling exercise that helps me keep the advantage when playing Scrabble with the hubby, is welcomed by me. ;)

I hope you enjoy making your chalkboards as much as I did!
Don't forget to check out all of the other chalkboard creations at The Shabby Chic Cottage! And, as always, go see the oh-so-fabulous makeovers at Between Naps on the Porch!


Read All About It!

Sunday, June 14, 2009

Goodwill Plant Stand Makeover

Welcome to Metamorphosis Monday and Today's Thrifty Treasures on Huckleberry Prairie!

This week I am sharing a plant stand find and makeover! I found the heart shaped plant stand at the Goodwill this weekend. They were having a 50% off the entire store sale! Guess how much I purchased this for. Go ahead, guess!


$2.50!!
What a bargain! Ha! ;)

The second I saw it, I knew it just HAD to be painted red. ;)

This red. ;)
The plant stand is enjoying being bathed in it's first coat of red paint...

And here it is after another coat and a little sanding:
I wanted to shabby it up a bit... but wanted the dark color to pop through (hence, not priming it first).

I made a little floral arrangement to pretty up the plant stand...

Started with a clear vase. Added a little bit of fun potpourri.

And added some red, green and wood to the arrangement. Of course it isn't complete without and red and white gingham bow (my favorite).


Not bad for $2.50 and a little red love. :)

For more fabulous makeovers... make sure to check out Metamorphosis Monday at Between Naps on the Porch.

For incredible thrifty finds... visit all the gals at Southern Hospitality's Today's Thrifty Treasures!

Hope everyone had a great weekend!


Read All About It!

Friday, June 12, 2009

Frugal Fashion Friday: Pretty Up Your Tanks and Tees

We all have those plain tanks and tees in our closet that could use a little bit of pretty. And by pretty, I mean the options are endless. By using fabric remnants and fusible "iron on" webbing... you can create words, pictures, designs... whatever your imagination can think of.
It really is as easy as 1, 2, 3.


Step 1... Draw on the fabric to create a design or picture... stencils work well for monograms.

Step 2... Cut out design (making sure to cut on the INSIDE of your drawing lines).

Step 3... Iron them on your shirt.


I'll give you pictorial instructions for you visual learners (I certainly am one!).
For this project, I created a tank top for my sister, Emily (aka the Fashionista from Le Quaintrelle). She is into being "green" (i.e. tries to use earth friendly products and eat organic food, etc). I decided to make her an "eco-friendly shirt" by using my fabric remnants (kind of like a form of recycling, right? ;) ). Here is how the shirt was created:

Started with a hot pink tank.

I cut out letters from the material, along with a make-shift Earth.
I then took my individual cut-outs and pinned them onto fusible webbing.
I cut the webbing to fit the shapes.

In case y'all were wondering what fusible webbing looks like in the package... this is what I use. (It seems to work quite well. After several washes there is virtually no lift from the fused fabric.)
I purchased this at JoAnn Fabrics.
Next, I laid out the pieces the way I wanted them, pinned them in place and ironed away! You can make it as simple or extravagant as you would like.
Here is the finished product:

Remember how I mentioned that I have a bad, bad habit of giving gifts that are themed, right?
Yeah. So I made this bag for her, too. You can find these panels in different colors at JoAnn Fabrics as well. I thought this would be a great way to be eco-friendly. She can take this bag thrifting, shopping or when she goes to flea markets and use it for purchases instead of plastic bags.
Nope. Didn't stop there either. I made a matching felt clip, too. ha! All you need is a sheet (or two) of felt, some embroidery floss and a snap clip!

That completed my "eco-friendly" themed gift for Emily... I sent the package off to her... and she sent me back some pictures of her new goodies! Here she is modeling them:

I'm 83% sure that the clip is upside down in this picture...or at least on its side. But then again, my felt continents weren't exactly to scale. In fact, their shape was more than likely unrecognizable to anyone but me. haha You're off the hook on this one, Emily. ;)

I did a similar DIY iron on project (and posted it a while ago) by cutting out fabric that had big design pieces...

Check out this project here.

Hope y'all have fun with creating unique designs for your plain tees and tanks!
It is officially the weekend now!! Go play. :)


Read All About It!